There is an old joke in tech: "The cloud is just someone else's computer." It's funny because it's true. Strip away the consoles, dashboards and marketing pages, and you are renting physical hardware in a climate-controlled data center. On AWS, the service at the center of that rental model is Amazon EC2 (Elastic Compute Cloud).
EC2 lets you launch a virtual server, configure it however you like and put it on the internet within minutes. The hard part is everything underneath. AWS offers hundreds of hardware configurations, three ways to place your server on physical machines and several ways to pay for it.
Get these choices right and you end up with a system that scales and doesn't drain your budget. Get them wrong and you either fight performance problems or open a scary bill at the end of the month.
In this article I'll walk through the three decisions you make for every EC2 instance:
- Instance type: which hardware you get
- Tenancy: who else runs on that hardware
- Purchasing option: how you pay for it
I'll use real-world scenarios instead of repeating the documentation.
Part 1: Instance Types
Picking an instance type is like buying a laptop. You wouldn't buy a heavy gaming rig to browse the web. You also wouldn't buy a cheap Chromebook to render 4K video. EC2 works the same way, just at data center scale.
AWS groups instances into families. Each family has a different ratio of CPU, memory, network and storage.
Reading an Instance Name
Before looking at the families, you need to know how to read an instance name.
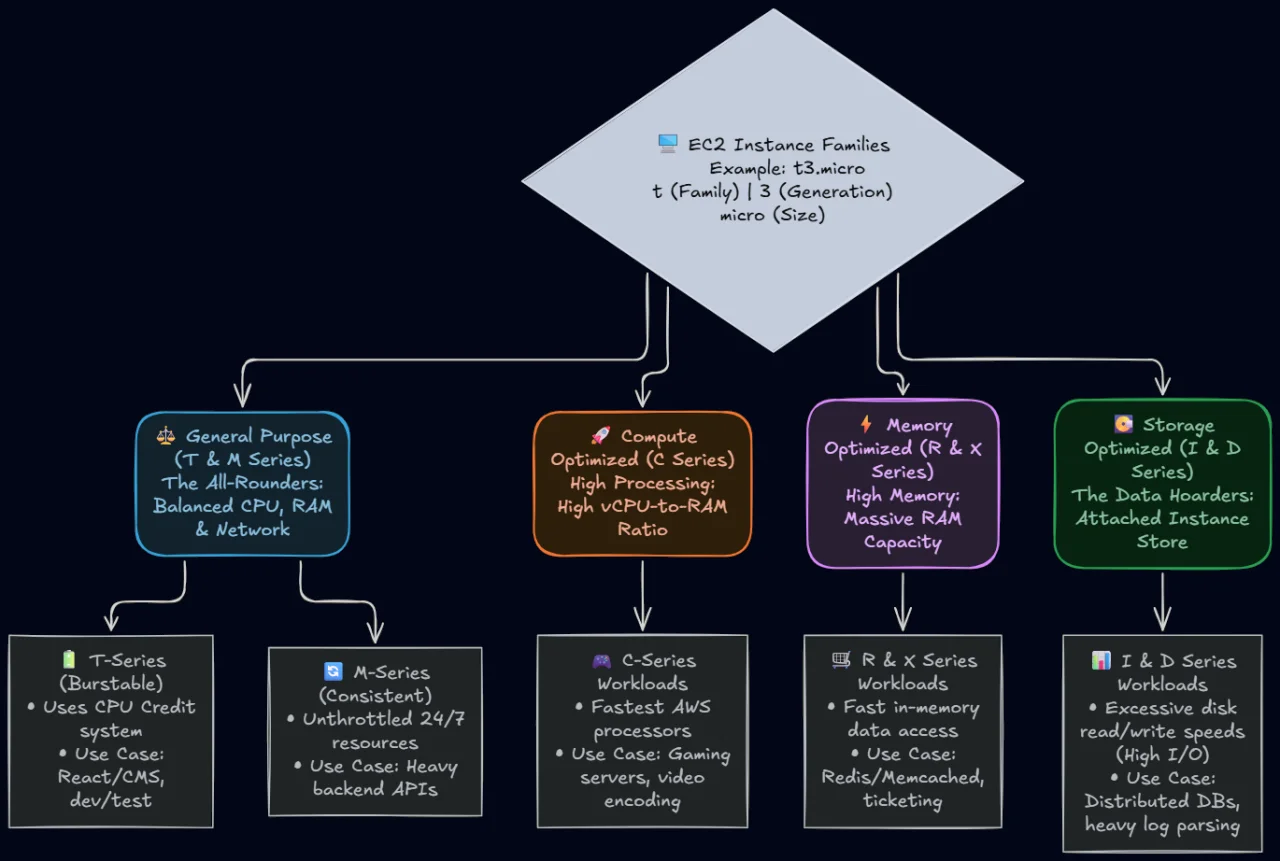
Take t3.micro:
tis the family (general purpose, burstable)3is the hardware generation (newer generations are usually faster and cheaper per unit of work)microis the size, which decides the exact number of vCPUs and the amount of RAM
Sometimes there are extra letters after the generation.
The g in r6g.large means the instance runs on AWS Graviton, an ARM processor built by AWS.
A d (like m6id) means the instance comes with local NVMe storage.
General Purpose: T and M
General purpose instances balance compute, memory and networking. They aren't the best at any single thing, which makes them a good fit for most workloads.
The T series is burstable and runs on CPU credits. Think of it like a mobile data plan. While your instance runs below its baseline CPU usage, it earns credits. When traffic spikes, it spends those credits to burst up to full CPU performance. What happens when the credits run out depends on the mode. In standard mode the instance gets throttled back to its baseline. In unlimited mode (the default for T3 and newer) it keeps bursting, and AWS bills you for the extra CPU time.
The M series has a similar CPU-to-RAM ratio but no credit system. You get consistent performance around the clock.
T instances are a good fit for a React frontend, a WordPress site or a test environment. They handle the quiet baseline and burst when someone shares your link on social media. For a backend API that receives heavy traffic all day, pick the M series instead. A T instance that bursts all day costs you more than an M instance that never has to.
Compute Optimized: C
C instances have a high ratio of vCPUs to RAM and run on the fastest processors AWS offers.
Think of a multiplayer game server that calculates player state in real time. Or a media company that encodes raw video into several resolutions for streaming. Neither needs much memory. Both need a lot of raw processing power. That's where the C series fits.
Memory Optimized: R and X
R and X instances are the opposite of compute optimized. They come with a lot of RAM per vCPU.
This matters because reading from memory is much faster than reading from disk, even a fast SSD.
Take a ticketing platform for a big concert or sporting event.
When sales open, thousands of users hit the site at once.
You don't want every request to query your primary database.
Instead, you put an in-memory cache like Redis or Memcached in front of it.
The cache keeps the most requested data in RAM, and an R instance gives it room to grow.
An r6g.large starts at 16 GB.
The largest R and X sizes go into terabytes.
Storage Optimized: I and D
Most EC2 instances store data on Amazon EBS (Elastic Block Store). An EBS volume is a network-attached drive. Storage optimized instances also come with large, very fast disks that are physically attached to the host. This is called the instance store.
If you run a distributed database or need to parse huge amounts of logs per second, the I series gives you the high disk I/O for it. The D series focuses on dense, cheap HDD storage for things like data warehouses and distributed file systems.
Important: instance store data is temporary. When you stop or terminate the instance, the data is gone. Only use it for data that is replicated elsewhere or that you can rebuild.

EC2 on One Page (No Fluff)
Launch instances like a pro. Our EC2 cheat sheet covers instance types, networking, and storage - everything you need to know.
HD quality, print-friendly. Stick it next to your desk.
Part 2: Tenancy
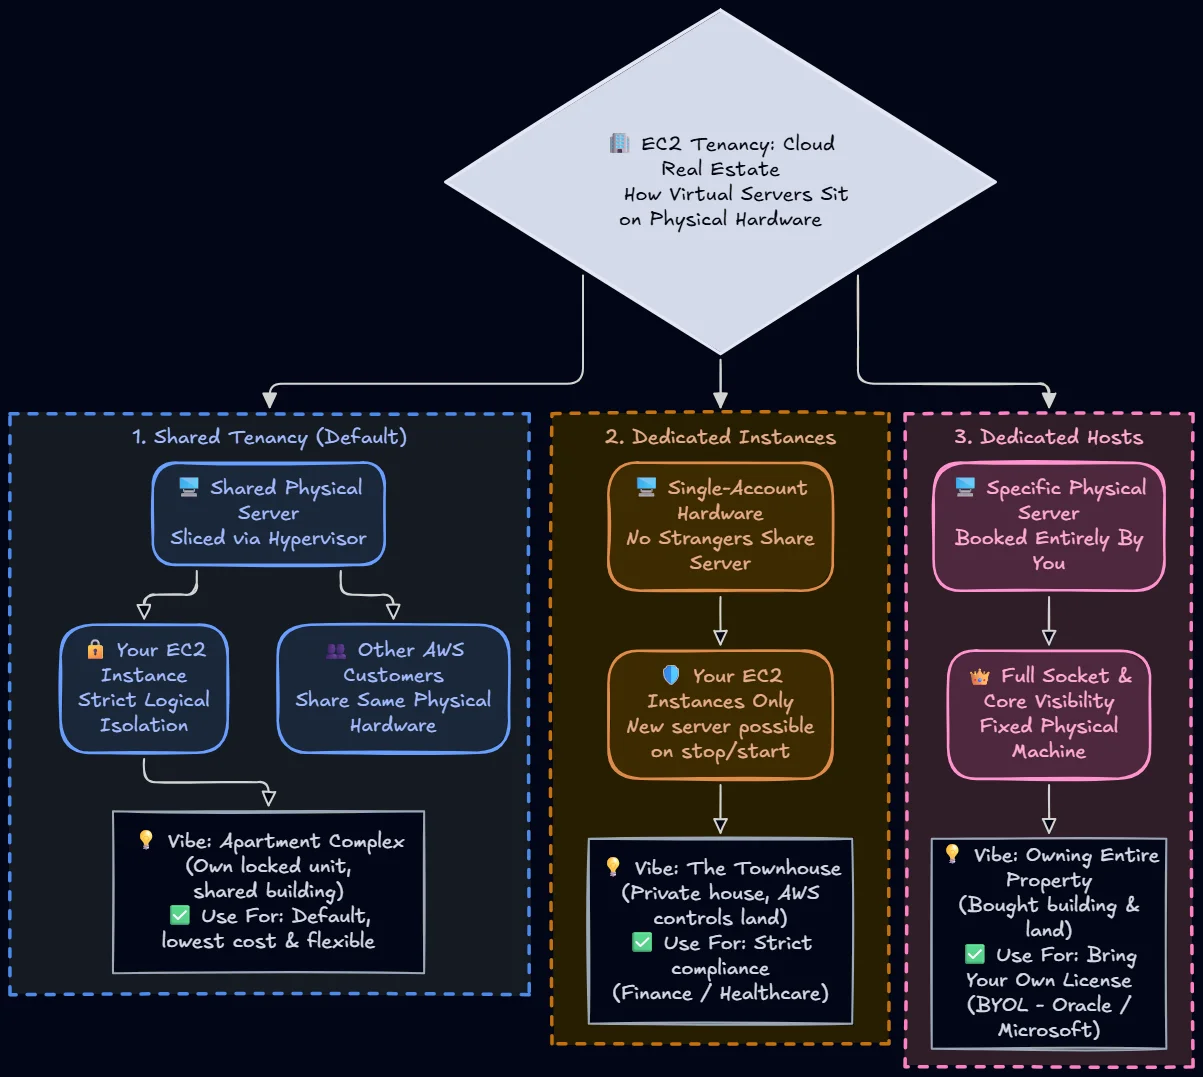
Tenancy is one of those topics developers ignore until a security auditor asks about it. It defines how your virtual servers are placed on the physical hardware in AWS data centers.
Shared Tenancy: The Apartment
Every instance you launch uses shared tenancy by default. AWS splits a large physical server into several virtual machines using a hypervisor. You get one slice. Other AWS customers get the other slices.
AWS keeps those slices strictly isolated. Other customers on the same hardware can't see your data, and you can't see theirs.
It's like renting an apartment. You have your own lock and your own rooms, but you share the building, the plumbing and the foundation with your neighbors.
Use shared tenancy unless you have a legal or compliance reason not to. It's the cheapest and most flexible option.
Dedicated Instances: The Townhouse
Dedicated Instances run on hardware that is reserved for your AWS account. No other customer shares the physical server with you. AWS still decides which physical server your instance runs on, though. If you stop and start the instance, it can come back up on a completely different machine.
It's like renting a townhouse. You don't share walls with strangers, but the property manager still decides which house you get.
Compliance usually drives this choice. Banks or healthcare companies handling patient records sometimes have internal rules that forbid their data from sharing hardware with anyone else. Dedicated Instances also cost more than shared ones. On top of the higher hourly price, AWS charges a fee per region for every hour you run at least one of them.
Dedicated Hosts: Owning the Property
A Dedicated Host is an entire physical server that you book for yourself. You can see the number of physical sockets and cores, and your instances stay on that host.
This is like buying the whole building and the land under it.
Dedicated Hosts are rarely about security. They're almost always about software licensing. Some enterprise vendors (Oracle and Microsoft, for example) license their software by physical sockets or cores, not by virtual CPUs. On shared hardware you don't know how many sockets the server has. With a Dedicated Host you can prove exactly which hardware you use, which you need to bring your own license (BYOL).
Part 3: Purchasing Options
You've picked the hardware and the tenancy. Now you have to pay for it. The way you pay should change as your project grows.
On-Demand: Pay As You Go
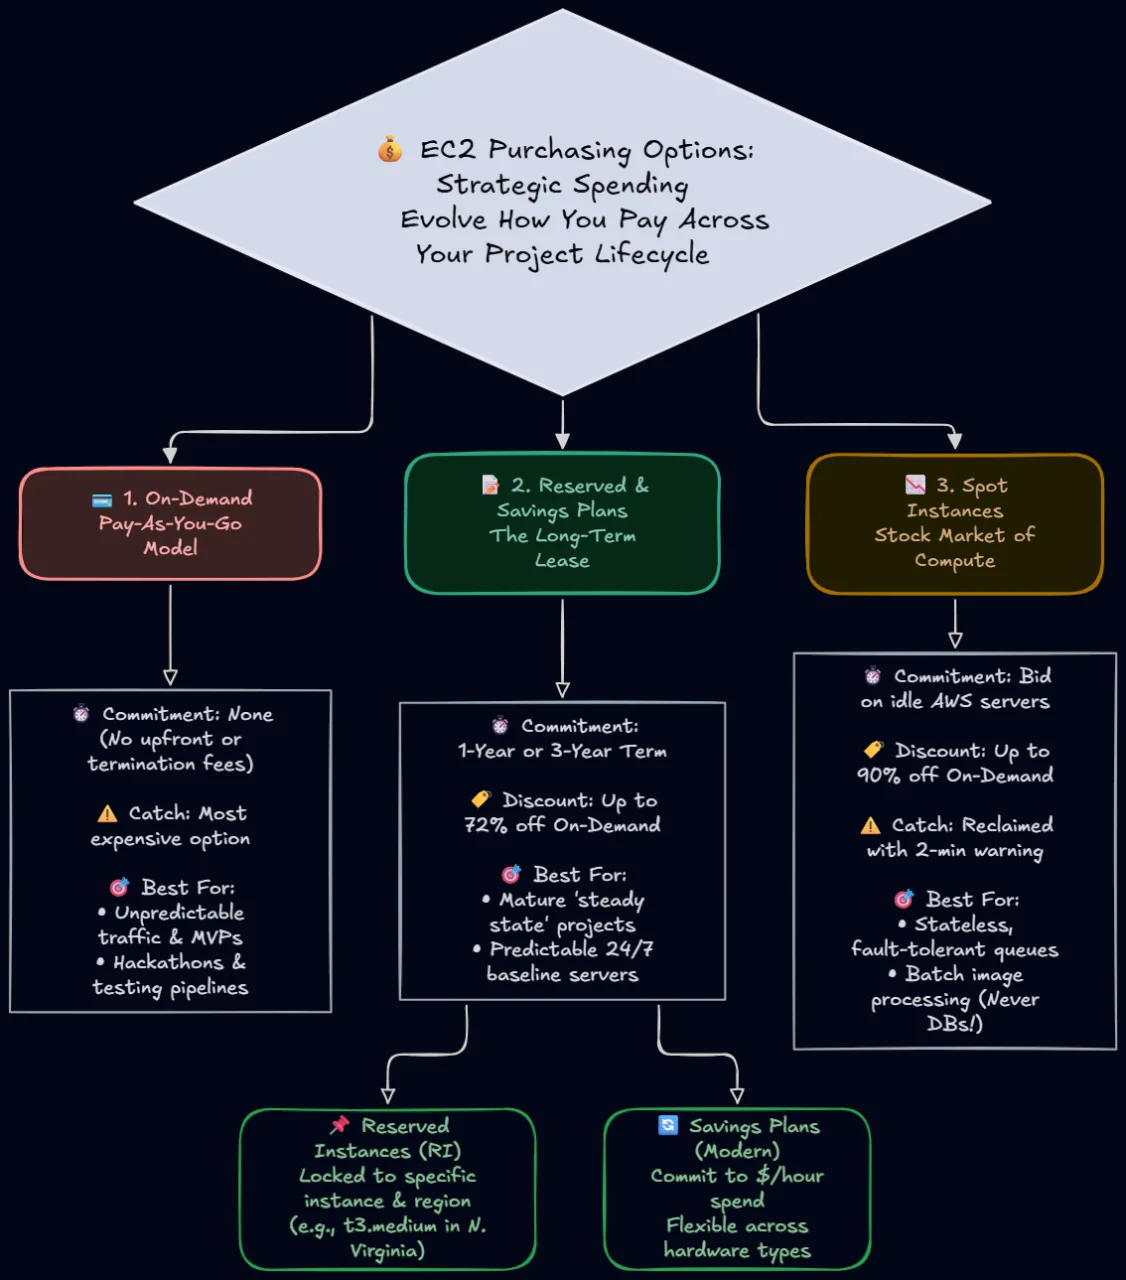
With On-Demand you pay per second of usage (with a 60-second minimum on Linux). There is no commitment, no upfront payment and no termination fee. When you stop the instance, the compute billing stops. Attached EBS volumes and Elastic IPs still cost money while the instance is stopped.
The catch is the price. On-Demand is the most expensive way to run EC2.
It's built for unpredictable workloads and experiments. Testing a new deployment pipeline, a hackathon environment or a startup MVP with no idea of the traffic: stick to On-Demand.
Reserved Instances and Savings Plans: The Long-Term Lease
Once a project matures, running everything On-Demand wastes money. If you know a server will run 24/7 for the next year, commit to it.
With a 1-year or 3-year commitment, AWS gives you up to 72% off the On-Demand price. There are two ways to commit:
- A Reserved Instance locks you to a specific instance type in a specific region, for example "one
t3.mediumin N. Virginia for a year" - A Savings Plan commits you to an hourly spend, for example "$2 per hour on compute for a year", and AWS applies the discount to whatever instances you run
Savings Plans are the newer and more flexible option. A Compute Savings Plan even follows you when you switch instance families, regions or move workloads to Fargate or Lambda.
Commit when your project reaches a steady state. Once you know your minimum infrastructure, put a Savings Plan on that baseline and keep the spiky part On-Demand.
Spot Instances: Spare Capacity at a Discount
AWS runs huge data centers, and at any moment a lot of that capacity sits idle. AWS sells this spare capacity as Spot Instances at up to 90% off the On-Demand price.
The catch: AWS can take the capacity back whenever it needs it. You get a two-minute warning, and then your instance is interrupted. You don't control when that happens. You used to bid for Spot capacity, but that model is gone since 2017. Today the Spot price moves slowly with long-term supply and demand, and you just pay the current price.
That makes Spot a fit for stateless, fault-tolerant work only. Never put a database on Spot.
A good example is image processing. You put jobs into an Amazon SQS queue, and a fleet of cheap Spot Instances pulls and processes them. A worker only deletes a message after it finishes the job. If AWS reclaims the instance halfway through, the message becomes visible in the queue again and another worker picks it up. No job gets lost.
Putting It All Together
Real systems rarely use a single instance type. Here is how a small startup might mix all three decisions to balance performance and cost.
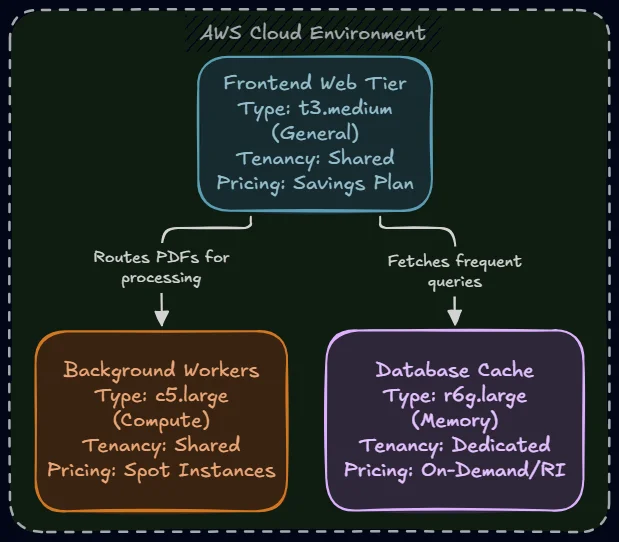
The frontend web tier serves the UI and handles incoming traffic.
It runs on t3.medium instances with shared tenancy.
Traffic changes during the day, and the CPU credits absorb the spikes.
The site has to be online 24/7, so the startup covers these instances with a 1-year Savings Plan.
The background workers parse PDFs that users upload.
That's CPU-heavy work, so they run on compute optimized c5.large instances.
They're Spot Instances, also on shared tenancy.
If AWS reclaims one, the job goes back to the queue and gets retried a few minutes later.
Users don't notice.
The cache keeps frequent database queries in memory so pages load fast.
It runs on a memory optimized r6g.large.
The cached data is sensitive, and the investors require strict compliance, so this server runs as a Dedicated Instance.
It's On-Demand for now and moves to a Reserved Instance once its size stops changing.
In practice, you would probably run this cache on Amazon ElastiCache instead of managing Redis on EC2 yourself. The instance families are the same, though, and the same choices apply.
Your Turn: Launch an Instance
Reading about the cloud is one thing. The concepts only stick once you've used them.
Don't just close this article. Log in to the AWS Console and do this:
- Open the EC2 dashboard and click "Launch instance".
- Pick Amazon Linux 2023 and a
t3.micro, which is Free Tier eligible. - Keep the tenancy on shared and the purchasing option on On-Demand.
- Create a key pair and allow SSH and HTTP in the security group.
- SSH into the server and install Nginx.
- Open the public IP address in your browser and look at the Nginx welcome page.
On Amazon Linux 2023, step 5 looks like this:
ssh -i my-key.pem ec2-user@<public-ip>
sudo dnf update -y
sudo dnf install -y nginx
sudo systemctl enable --now nginx
Once it works, terminate the instance so you don't get billed for it.
Happy building!